LED Bollard light posts are a staple in modern landscape design, offering aesthetic appeal and functional lighting for walkways, gardens, and security areas. Whether you need to install bollard lights or replace existing ones, choosing the right approach is vital for ensuring longevity and effectiveness. Despite aluminum bollard finishes, die-cast aluminum, a brass bollard, or steel bollard, proper installation is key. This article provides a detailed guide on optimizing the installation of a bollard light post, drawing from a practical example at Mississippi State University (MSU), where a damaged bollard light post was efficiently replaced.
Key Takeaways
-
-
Flexible Installation Options: Installing new LED bollard light posts can be efficiently managed without the need for fresh cement, using mechanical anchors such as Strong-Tie Strong-Bolt 2 or Red Head anchors. This approach offers a practical and cost-effective alternative, ensuring strong and durable mounting on existing cement surfaces.
-
Importance of Proper Installation Techniques: Ensuring that bollard light posts are properly leveled during installation is crucial for both aesthetic and functional purposes. Most Access Fixtures bollard lights come with built-in levels, aiding in precise installation which is essential for optimal performance and longevity of the light posts.
-
Consultation and Adherence to Guidelines: Like Mississippi State University’s approach, consulting with lighting specialists and closely following provided installation guidelines are vital steps. These ensure that the installation process addresses any site-specific challenges and complies with safety standards, leading to successful and secure bollard light setups.
-
What is a Bollard Light?
Definition and Purpose
A bollard light is a type of outdoor lighting fixture designed to provide pathway and landscape illumination. These vertical luminaires are typically mounted on the ground, making them an ideal solution for various outdoor lighting needs. Bollard lights are essential for providing uniform lighting, enhancing both the aesthetic appeal and safety of residential and commercial areas. Whether illuminating walkways, gardens, or security zones, bollard lights ensure that outdoor spaces are well-lit and inviting.
Types of Bollard Lights (LED, Solar)
There are several types of bollard lights available, each catering to different needs and preferences. LED bollard lights are among the most popular due to their energy efficiency and long lifespan. These lights consume less power while providing bright, consistent illumination, making them a cost-effective choice for outdoor lighting. Solar bollard lights, on the other hand, harness energy from the sun, making them an excellent option for areas with limited access to electricity. They are environmentally friendly and reduce energy costs. Traditional incandescent bollard lights are also available, but they are less energy-efficient and have a shorter lifespan compared to LED and solar options. Each type of bollard light offers unique benefits, allowing you to choose the best fit for your specific lighting needs.
Benefits of Using Bollard Lights
Bollard lights offer numerous benefits that make them a preferred choice for outdoor lighting. One of the primary advantages is their energy efficiency, especially with LED and solar options, which help reduce energy consumption and lower utility bills. Bollard lights also have a long lifespan, reducing the need for frequent replacements and maintenance. Their durability allows them to withstand harsh weather conditions, ensuring reliable performance year-round. Additionally, bollard lights can be customized to fit various applications, from residential pathways to commercial landscapes, providing versatile lighting solutions that enhance both safety and aesthetics.
Someone running over one of your bollard lights with their car necessitates immediate action! This recently happened at Mississippi State University, resulting in the demolition of a LED bollard light.
Whether an overly enthusiastic (and consequently distracted) Mississippi State Bulldogs fan or a rival fan seeking revenge caused the incident, the university still needed a replacement for the bollard light.
The university chose an Access Fixtures bollard light because it matched the style of their remaining bollards. MSU opted not to replace all the bollard lights or the cement to which the demolished bollard light was attached.
After placing the order, the MSU facilities manager consulted an Access Fixtures lighting specialist on installing the new bollard light without pouring new cement for the anchor bolts. The installation process also involved carefully handling the bollard head to ensure the wiring was properly connected and the head was securely attached to the body of the fixture.
Pre-Installation Considerations
Assessing the Site and Existing Infrastructure
Before installing bollard lights, it is crucial to thoroughly assess the site and existing infrastructure. Start by evaluating the terrain and soil conditions to determine the best placement for the bollard lights. Check the existing lighting fixtures and wiring to ensure they are in good condition and compatible with the new installation. Understanding the purpose of the lighting and the desired lighting effect will help in selecting the appropriate bollard lights and positioning them correctly. Additionally, consider local building codes and regulations to ensure compliance and avoid any legal issues. Environmental factors, such as exposure to weather elements, should also be taken into account to ensure a secure installation and proper alignment of the bollard lights. By carefully assessing the site and existing infrastructure, you can ensure a smooth installation process and optimal performance of the bollard lights.
LED Bollard Light Installation With Anchor Bolts
When replacing an old or broken outdoor bollard light with a new one, the wiring from the existing fixture may still be good, but it is crucial to ensure the bollard body is properly aligned with the base casting and secured correctly. However, it is unlikely that the old bolts will fit the pattern of the new fixture, even if a mounting bolt or two may still work.
For optimal setup sinking new mounting bolts in fresh cement is always recommended. However, sometimes it may be too expensive or logistically challenging to install new bollards in this manner.
In such cases, when the need arises to install new bollard lights without pouring new cement mechanical anchors can be a viable solution. Anchors such as Strong-Tie Strong-Bolt 2 or Red Head anchors from Trubolt can be utilized to mount new bollard lights onto existing cement.
Once you follow the instructions and install and set up your bollard lamp, you’re all set!
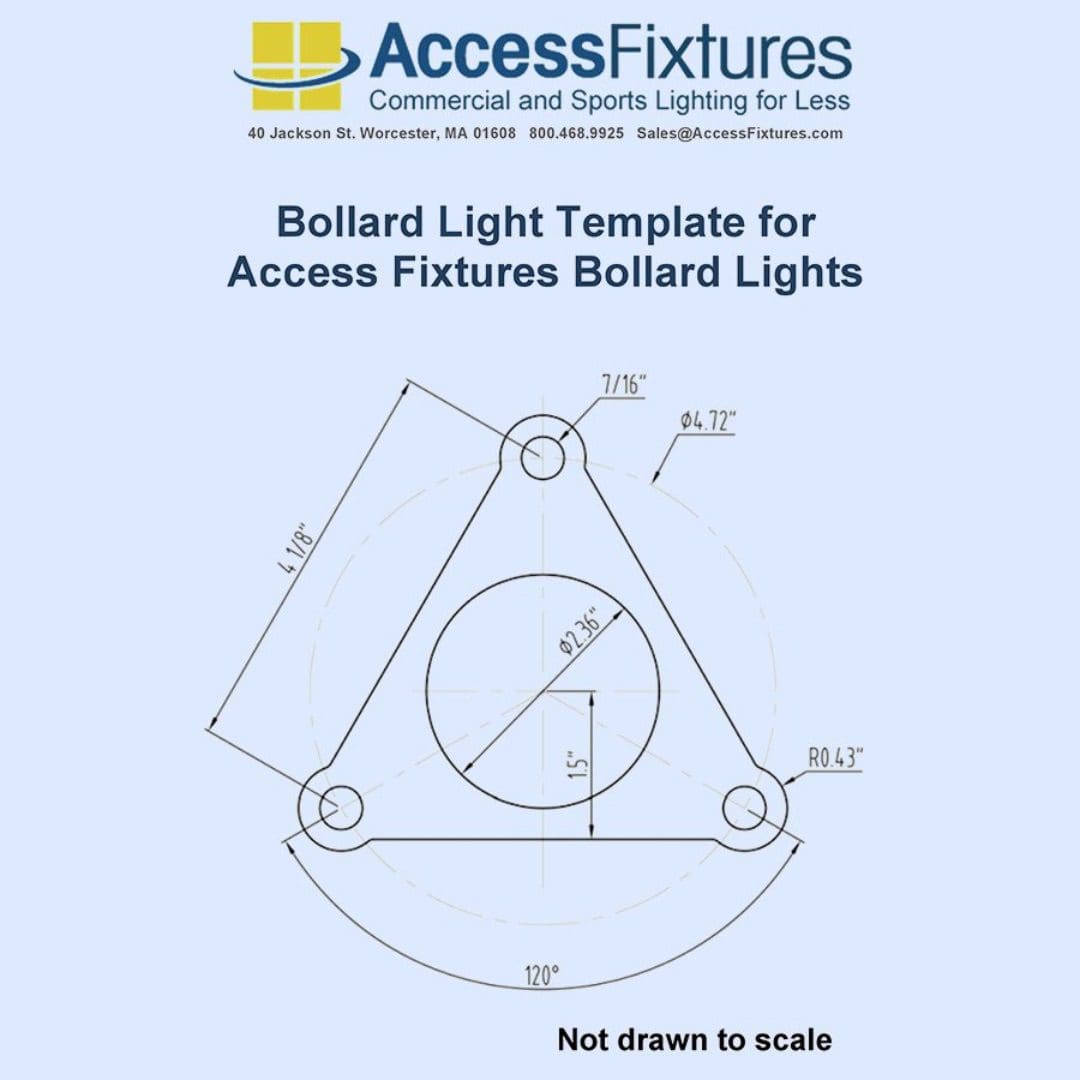
Access Fixtures bollard lights are designed to accommodate 3/8″ diameter bolts. Be sure to select the appropriate length for your specific requirements. When installing bollard lights, ensure the base or fixing plate on every fixture is leveled.
Access Fixtures bollard light bases come with built-in levels, making installation easy; the result will be determined by the quality of the installer’s work.
Installation Techniques Without New Cement
Traditionally, installing new bollard light posts involves embedding mounting bolts in fresh cement, ensuring that anchor bolts rise above the wet concrete during installation for a secure and stable fixture. However, this method can be costly and complex. An alternative method used by MSU involves:
- Utilizing Mechanical Anchors: MSU opted for mechanical anchors to secure the new bollard light post to the existing cement, avoiding the need for new cement. This method is effective and less disruptive, using products like Strong-Tie Strong-Bolt 2 or Red Head anchors from Trubolt.
- Site Preparation: Ensure the site’s existing wiring is functional and clear the area of any debris or damaged hardware before installation.
- Bollard Light Post Installation: It is crucial to follow the installation guidelines specific to the bollard light post being installed. For Access Fixtures bollard light posts, which are designed for 3/8″ diameter bolts, selecting the correct bolt length is essential for a secure fit.
- Leveling the Bollard Light Post: Most Access Fixtures bollard light posts include built-in levels to aid in achieving a perfectly vertical alignment, which is key for both looks and performance.
Backfilled Anchor Installation: A Robust Alternative
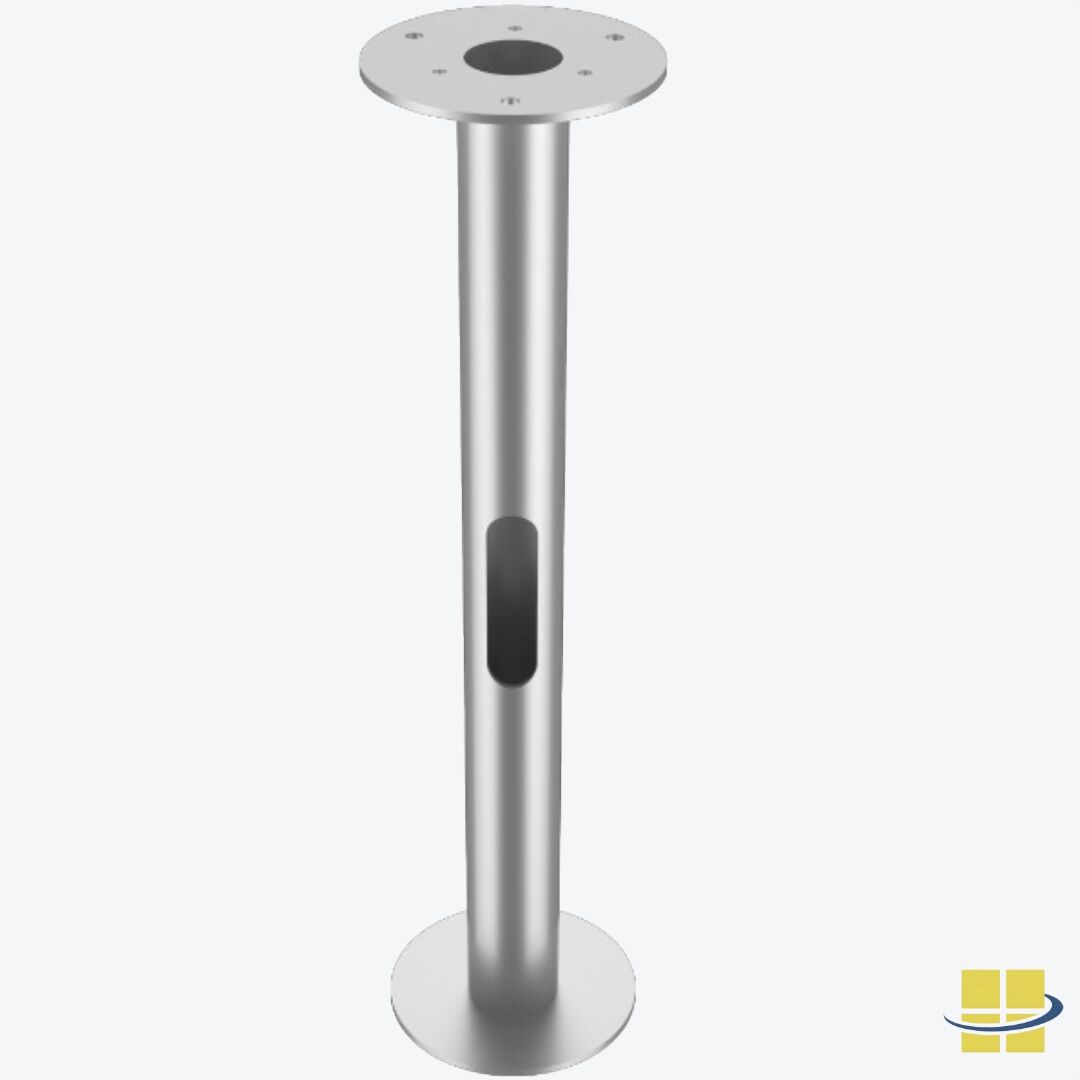
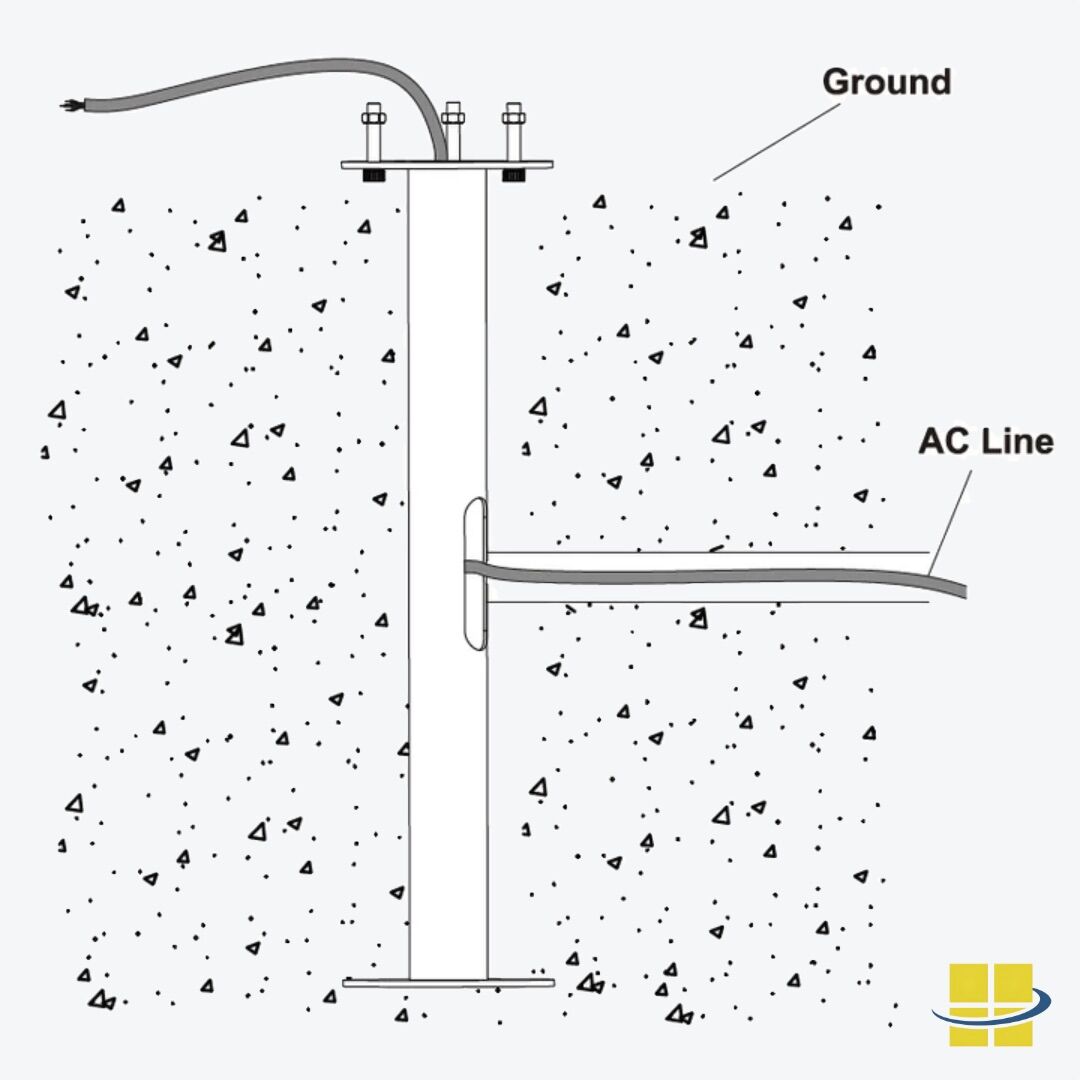
For installations requiring additional stability, especially in high-traffic or loose-soil environments, ground mounting with a backfilled anchor can be an excellent alternative to mechanical anchors or new cement. A specific example is an anchor made of Q235 (a type of carbon steel) and SPCC (cold-rolled steel), with hot dip galvanizing for corrosion resistance, measuring Ф130х508mm.
- Material and Durability: The Q235 + SPCC combination provides a strong and durable foundation, while the hot dip galvanizing process ensures long-term resistance to rust and environmental wear, making it ideal for outdoor applications.
- Installation Process: To install a backfilled anchor, dig a hole to accommodate the anchor’s dimensions (Ф130х508mm), place the anchor in the hole, and backfill with soil, gravel, or a similar material to secure it in place. Ensure the anchor is level before backfilling to maintain proper alignment with the bollard light post.
- Benefits: This method provides a robust foundation without the need for new cement, making it a cost-effective and less invasive option. It’s particularly useful in areas where the existing cement base is damaged or unavailable, as the backfilled anchor can be installed directly into the ground.
- Considerations: Ensure the soil conditions are suitable for backfilling. In loose or sandy soil, additional stabilization, such as compacting the backfill material, may be required to ensure the anchor’s stability.
Installation Best Practices
- Evaluate Existing Infrastructure: Before installation, assess the condition of the existing infrastructure, such as wiring and cement bases.
- Expert Consultation: Like MSU, consulting with lighting specialists can provide valuable insights and help troubleshoot any potential issues.
- Adherence to Guidelines: Always adhere to the manufacturer’s installation instructions to ensure the bollard light post is installed correctly and safely.
- Consider Environmental Factors: When using backfilled anchors, ensure the soil conditions are suitable for backfilling to provide adequate support. In areas with loose or sandy soil, additional stabilization may be required.
- Consider Light Direction: Ensure the direction of the light beams is properly aligned to achieve the desired illumination effect and avoid unwanted glare.
Conclusion
Replacing or installing new bollard lighting does not necessarily require extensive or expensive preparations. By employing innovative installation methods like mechanical anchors and adhering to a few key installation practices, you can efficiently and effectively manage the installation of bollard light posts. MSU’s experience, combined with options like the backfilled anchor, serves as a model for managing bollard light post installations with minimal disruption and optimal results.
Frequently Asked Questions
Can you replace a bollard light without pouring new cement?Yes, you can replace a bollard light post without pouring new cement by using mechanical anchors or a backfilled anchor. These methods involve securing the new bollard light to the existing cement or ground, which is effective and less disruptive.
What type of anchors are recommended for installing bollard post lights without new cement?For installations without new cement, Strong-Tie Strong-Bolt 2 or Red Head anchors from Trubolt are recommended. Alternatively, a backfilled anchor made of Q235 + SPCC with hot dip galvanizing, measuring Ф130х508mm, can provide additional stability in certain conditions.
Is it necessary to replace the wiring when installing a new lighting bollard post?Not necessarily. If the wiring from the existing bollard light fixture is still in good condition, it can be reused for the new installation. Always check the wiring’s integrity before proceeding, especially when accessing it through the post’s window, as shown in the image.
How do you ensure the new bollard fixture is properly aligned and level?Most bollard light posts, such as those from Access Fixtures, include built-in levels on their bases. Using these, you can ensure the post is perfectly vertical during installation, which is crucial for aesthetics and stability. This applies to both mechanical and backfilled anchor installations.
What should be considered when selecting bolts for bollard light post installation?It’s important to select bolts that match the diameter required by the bollard light post—typically 3/8″ for many models. The length of the bolts should also be appropriate for the depth of the cement base or the anchor’s requirements, such as the Ф130х508mm backfilled anchor.
What steps should be taken for site preparation before installing new bollard posts?Before installation, clear the area of any debris or damaged hardware, and ensure that the existing wiring is functional. If using a backfilled anchor, ensure the ground is suitable for embedding and backfilling the anchor.
How do you handle bolt patterns that don’t match between the old and new bollard light posts?If the bolt patterns do not match, using adaptable mechanical anchors or a backfilled anchor can solve the issue as they do not require the new fixture to align exactly with the old bolt positions.
What are the best practices for a successful bollard light post installation?Best practices include assessing the existing infrastructure (like wiring and cement bases), consulting with lighting specialists if necessary, strictly adhering to the manufacturer’s installation guidelines, and considering alternative anchoring methods like the Q235 + SPCC backfilled anchor for enhanced stability.
How long does it take to install an LED bollard light post using mechanical or backfilled anchors?The time can vary depending on the specific conditions and preparation needed. Installing a bollard light post with mechanical anchors can generally be completed in a few hours. Using a backfilled anchor, such as the Ф130х508mm model, may take slightly longer—typically around 4-6 hours—due to the need for digging and backfilling.
What should be done if the existing cement base is damaged?If the existing cement base is significantly damaged, it might not securely hold mechanical anchors. In such cases, repairing or replacing the cement base might be necessary. Alternatively, a backfilled anchor can be used to bypass the damaged cement entirely by anchoring directly into the ground.
What are the benefits of using LED lights for bollard lighting?LED lights are energy-efficient, have a long lifespan, and provide bright, consistent illumination, making them a cost-effective choice for outdoor lighting.


